Sunday, December 21, 2014

Clean Recipe -Oatmeal-Banana Bread

Clean Recipe - Banana Bread Superfood Porridge


A cold morning comfort food you don't have to feel guilty about indulging in!! 
It really does taste like warm banana bread fresh from the oven, I could eat this every day during the winter, and the best part it is made with all clean ingredients and loaded with super foods! It is sure to get your day off to a great start.  The base of this porridge is a quinoa/steel cut oat mixture (I usually make a big pot and use through out the week) which makes this very filling and will provide you with lasting energy, while the banana, chia seeds, walnuts, maca powder and pure maple syrup provide tons of flavor and beneficial vitamins and nutrients. I have just as little self control with this breakfast as I would the most glutenous baked goodie! Its delicious, I guarantee you and your taste buds will be completely satisfied! Enjoy!


Recipe:
1/2 Cup Quinoa 
1/2 Cup Steel Cut Oats
1 1/2 Cups Water
1 Banana
2 Tbsp Chia Seeds
2 Tbsp Pure Maple Syrup
2 Tbsp chopped Walnuts (I prefer toasted walnuts)
1-2 Tbsp Maca Powder (optional/add to taste)

1 - In a medium pot bring water to a boil, add quinoa, steel cuts oats and chia seeds. Reduce heat to low and cover. Stir occasionally. Cook until a thick sticky mixture, about 25 min.
(I usually do a double batch and store it in the refrigerator and reheat on stove to shorten prep time on busy weekday mornings, you can add any of your favorite porridge toppings for a quick and easy breakfast)
2 - Once cooked turn heat off add remaining ingredients 
3- Pour in bowls and top with sliced banana and walnuts
4 - Enjoy!

Makes 2 hearty servings 

**optional tip - My favorite way to serve this it to turn it into a bake by taking 2 cups of my refrigerated precooked porridge and stir in the above listed ingredients. Pour in 6 oz ramekins top with banana slices and walnuts and place in a 350 degree pre-heated oven for 25-30 min. 


Sunday, June 8, 2014

Clean Eating Dessert - Grilled Peaches

Grilled Peaches - Clean Eating Dessert


The summer months are now upon us, and with that comes the desire to slim and trim to get back our  bathing suit bodies. Another highlight this time of year is summer BBQ's and gatherings. Often these gathering become diet pit traps surrounded by yummy munchies, grilled food, and of course dessert. It tends to be hard to work towards or even maintain our bathing suit bodies in these situations. This is when I like to share my favorite clean eating dessert option with my guests. Grilled peaches (or nectarines). They are a quick, simple and clean choice. (And this time I'm talking clean as in you have no kitchen mess to clean up with these :>) What makes these so yummy? Well, once the peaches start to warm on the grill the natural juices start to leak out and the continued heat on them causes the juices to caramelize leaving a natural delicious sweetness! They are guaranteed to be a crowd pleaser at your next gathering. People will revel at the creativity, taste and the health factor of dessert.

Here's How:
Slice peaches (or nectarines) in half and take out the pits.
Place on grill at low heat for approximately 5 minutes on each side. You want to see the juices coming out and the peaches to maintain their shape.
 (If you leave them on too long they will become mush and be challenging to remove from the grill)
Top with Greek Yogurt.
Drizzle with Honey.
Sprinkle them with Cinnamon.
Serve while still warm and Enjoy!


Clean Eating Dessert - Grilled Peaches


Wednesday, May 14, 2014

Clean Recipe - Chocolate Goji Berry Benefits

Clean Goji Berry Recipe and Benefits


Goji Berries are a pleasant new addition to my diet. I had been seeing them included in recipes, read many articles and seen a few documentaries that mentioned that goji berries are considered a superfood and that they are highly beneficial for multiple reasons. Being that I am constantly on the hunt to expand the selection of clean natural foods in my pantry I decided to pick some up at my local health food store. Goji berries are about the size of a raison and, as seen in the above photograph, are a beautiful rich reddish-orange color. When eaten on their own they are sweet with a slight bitter quality. I have been experimenting with them over the past few weeks sprinkling them on smoothie bowls, salads, adding them to trail mixes and most recently I modified my Raw Chocolate Energy Bar recipe to include goji berries. I have enjoyed them every way I have tried though I do prefer them as and addition to other foods rather then on their own. Here are just some of the suggested benefits of adding goji berries to your daily diet.
"A remarkable concentration of antioxidants that help combat premature aging, with 10 times more antioxidants than red grapes and 10 to 30 times the anthocyanins of red wine.
A synergy of monounsaturated (healthy) fats, dietary fiber and phytosterols to help promote cardiovascular and digestive health.
An almost perfect essential amino acid complex in conjunction with valuable trace minerals, vital to proper muscle contraction and regeneration.
The fatty acid content in Goji berries resembles that of olive oil, and is rich in monounsaturated oleic acid. Oleic acid is important for a number of reasons. It helps omega-3 fish oils penetrate the cell membrane; together they help make cell membranes more supple. By keeping the cell membrane supple, all hormones, neurotransmitter and insulin receptors function more efficiently. This is particularly important because high insulin levels create an inflammatory state, and we know, inflammation causes aging."
For more detailed information on goji berry benefits visit this site: http://www.gojiberrieshealthbenefits.com
                          And now for the recipe:
Ingredients
12 pitted organic Dates
2 Tbsp Flaxseed Meal
1 Tbsp Goji Berries
4 tsp organica Cacao Powder (+ additional 2 tsp for topping)
3 tsp Maca Powder
2 tsp Carob Chips or Cacao Nibs
2 tsp raw organic Honey
2 tsp organic Coconut oil

Blend all ingredients together in a food processor. Roll a full tablespoon of dough into a ball. Sprinkle  2 tsp cacao powder on cutting board and roll balls until fully coated. (this last step is optional but I it is a great way to add more superfood qualities and helps the balls to not be so sticky when storing and holding them) Store in refrigerator for up to a week and Enjoy!!


Tuesday, May 13, 2014

Raw Recipe - Chocolate Energy Bar

Raw Chocolate Recipe


Im sure by now it has become apparent to those who have visited my site before that I have a major sweet tooth. Im constantly trying to find new ways to get cure my sweet tooth and ensure that my body is still fed with the proper nutrients it needs to look and feel its best. I love baked goods. Brownies, cakes, muffins, mmmmm. But the longer I go sticking to a mostly clean diet the harder it is for me to eat the versions of those things I can find in a store. So instead I make my own. These bites (which can also be made into a bar) are close to being a 100% raw food, gluten free and are infused with several superfoods! They taste as though I rolled brownie batter into a ball, The perfect healthy sweet tooth cure that can be eaten as a snack or dessert. Best part is they only take 10 minutes to make and are ready to eat immediately!

Ingredients

12 pitted raw Dates
3 Tbsp Cashews
3 Tbsp raw un-sweetend Coconut Flakes (2 for batter, 1 reserved for topping)
1 Tbsp Coconut Oil
4 Tsp raw Cacao Powder
4 Tsp raw Maca Powder
2 Tsp raw organic Honey

Place all ingredients into a food processor.

Once all ingredients are well blended together (dough will be coarse and have small chunks) take a full tablespoon full of dough and squeeze and roll into a ball using your hands.


Once all dough is rolled sprinkle the remaining coconut flakes on a cutting board and roll the balls in it until well coated (optional step)


Yields about 12 balls.
Store in refrigerator for up to a week.


Thursday, May 1, 2014

Clean Recipe - Overnight Oats - Peanut Butter and Jelly


Overnight Oats Recipe - Peanut Butter and Jelly


If you have yet to try overnight oats, I highly recommend you remedy that real soon!! :)
Overnight oats have become a standard addition to my refrigerator. Once you try them it is easy to tell why these are my go to breakfast. With no more then five minute of prep time, endless flavor possibilities, and the ability to "grab and go" overnight oats will quickly become a busy body's best breakfast companion!
This recipe is a great standard base for overnight oats. You can add just about any fruit or flavor addition and it will taste delicious.  The other morning as I was running out the door to a hike I grabbed a jar of the peanut butter oat base, added banana slices and a drizzle of honey.... All I have to say is Yum!

Oat Ingredients:
1 cup Organic Rolled Oats
1 cup Unsweetened Vanilla Almond Milk
1 cup Plain Greek Yogurt
2 tbsp Fresh Nut Butter (or 2 tbsp PB2)
2 tsp Honey
2 tsp Maca Powder

Place all ingredients in a medium jar stir well and store overnight or up to 5 days in refrigerator. Makes 2 Servings

Jelly Ingredients:
1/2 cup Strawberries
1/2 cup Frozen Rasberries

Puree together add to oats and Enjoy immediately!

Want to try other delicious overnight oat recipes? Here are more of my favorites.


Thursday, April 24, 2014

Clean Eating Recipe - Lemon Chia Overnight Oats

Lemon Chia Overnight Oats

I am a sucker for anything lemon or chocolate flavored! I really wanted to get some chocolate into this dish but I wasn't brave enough. That will have to be an experiment for another day ;-)
These overnight oats were so refreshing, they just tasted clean zesty. The best part was they left a great sweet after taste in my mouth. They would go well with just about any berry, I can't wait to try them with blueberries!


Recipe
1 Cup Organic Rolled Oats
6 oz Lemon Flavored Greek Yogurt
2 Tsp Chia Seeds
3/4 Cup Unsweetened Vanilla Almond Milk
1 Tsp Fresh Lemon Zest 
*optional for extra strong lemon flavor squeeze the juice out of half a lemon in to mixture

Mix all ingredients together in a jar store in refrigerator overnight and serve with your favorite berry!!
Makes two servings. 

Hope you enjoy your  Lemon Chia Overnight Oats!!


Wednesday, April 23, 2014

Clean Recipe - Chia Seed Pudding

Clean Eating Recipe - Chia Seed Pudding

Do you want to eat a Superfood for dessert?! Well here on is!
Chia seeds are considered superfood. The main health benefits of chia seeds are that they are loaded with antioxidants (antioxidants can help prevent signs of aging and also known to aid in the prevention of cancer), and they are a great source of omega-3.
Here is a quick and simple recipe that you can use for breakfast a snack or dessert!

Ingredients:
3 Tbsp Chia Seeds
1 Cup Unsweetened Almond Milk
1 Tsp Honey
1/8 Tsp Cinnamon
1/8 Tsp Vanilla Extract

Place all Ingredients into a jar stir well and store in refrigerator at least 8 hours before serving.
*makes 1 to 2 servings 
This Chia Seed Pudding Recipe tastes delicious with fruit added to it.
Enjoy!


Saturday, April 19, 2014

Clean Eating Recipe - Peanut Butter Cups

Clean Peanut Butter Cups Recipe
With only 3 ingredients these little nuggets are quick simple and absolutely amazing!!
I should mention though these are absolutely addicting and not 100% clean.  My choose to make the recipe quicker by using a chocolate bar for the chocolate layer instead of making my own chocolate sabotaged me from being able to classify this as fully clean ;-). However, I will note, the higher the concentration of cacao in your chocolate bar the higher the chances are of it being clean. I used a Scharffen Berger 82% Cacao bar so I guess I can say these are at least 82% clean! There are definitely times when shortcuts are worth it. When getting chocolate in my belly is a result of a shortcut, I am all for it! (I will be posting a homemade clean eating chocolate recipe soon that you can use as the chocolate here as well, stay tuned!)

Ingredients
1 cup fresh nut butter (I used fresh almond butter)*
2 Tbsp organic coconut oil melted
Dark chocolate bar

*In most health food stores such as Whole Foods, there are machines located in the bulk food bin section that you are able to put your choice of nuts in and turn them into fresh nut butter.

**Want a lower calorie treat there is a modified nut butter cup located at end of post :-)

In a medium bowl mix peanut butter with coconut oil. Once mixed well, split up the dough and place into each hole in a mini muffin tin. Press well into the bottom of each tin hole. Place in Freezer.

 Now melt your chocolate in a double broiler. Take tin out of freezer, using a spoon, place 1 to 2 spoonfuls of melted chocolate on top of peanut butter. 

Return to freezer for about 10 minutes or until chocolate hardens. Take a thin knife and press between peanut butter cup and tin. This should pop each cup out of their hole. Storing in the freezer is recommended.

**For lower calorie less clean version follow this ingredient list **
1/2 cup fresh peanut or almond butter
1/2 cup PB2
1/4 cup water
2 Tbsp coconut oil
Dark chocolate bar

Mix PB2 powder with water in a medium bowl, then add fresh almond butter and coconut oil. The rest of preparation and storage recommendations are the same as above.
Enjoy your Peanut Butter Cups!!


Clean Smoothie Recipe - Carrot Cake - Easter

Carrot Cake Smoothie Recipe
With Easter just a round the corner I was inspired to find a tasty healthy alternative to my favorite spring time dessert, carrot cake. Here is my recipe for a clean carrot cake smoothie. Tastes like I stuck a piece of frozen carrot cake in a blender!! Haha!
Ingredients
4 medium carrots cut into small pieces
1 frozen banana
6 dates
1/2 cup organic rolled oats
1/2 cup unsweetened vanilla almond milk
1/4 cup plain greek yogurt
2 Tbsp chopped walnuts
2 Tbsp organic shredded coconut
1/4 tsp vanilla extract
1/4 tsp cinnamon
handful of ice

Place all ingredients in blender. Blend. Pour. Sip and Enjoy!!
(makes 2 servings)
carrot cake smoothie recipe


Tuesday, April 15, 2014

Clean Eating Recipe - Roasted Nuts Cinnamon Sugar Flavor

Cinnamon Sugar Roasted Nuts
I always see the pre-packed flavored nuts in the grocery store and think yum, what a great idea. This is when I turn the package over, read the ingredients and then return them to the shelf disappointed. I am a sweets person, I swear I was born with a mouth full of sweet teeth! So naturally I wanted to experiment with infusing my nuts with some sweetness.  I mean who can really resist the nuts they sell on the corners in NY. The heavenly scent of caramelized sugar and roasted nuts wafting through the air piercing your nostrils with a much welcome and captivating scent, a far cry from the smoggy city air.  So you stop, you pull out a few dollars and purchase a warm bag. You can't get your wallet tucked away quick enough because you are so anxious to pop a few into your mouth. The second they touch your tongue you know your senses led you right, they are delectable so you grab another handful as you disappear back into the hustle! Ok, ok, Ill stop teasing your taste buds now.  What I am trying to say is not that these nuts compare to NY nuts, I don't think there is any comparison, but they were inspiration for my sweet nut experiment. And, I must say for a clean eating guilt free snack these are pretty darn good. They are also a great addition atop salads and chopped up in baking recipes.
Enjoy!!!

Recipe
1 Cup nuts of your choice
1 Tbsp coconut oil (you may have to melt it first)
1 tsp each of cinnamon and coconut sugar **

Heat oven to 425 degrees
Place nuts in a medium bowl. Pour the coconut oil over them and add the cinnamon and sugar. Toss together until nuts are well coated.
Spread evenly on a baking sheet and place on middle rack in oven.
Bake for 5-10 minutes, once you start smelling the nuts roasting they will be ready!

**you can add more cinnamon and sugar according to personal taste but be aware if you are taste testing when raw, they will taste sweeter after they are roasted)

Thursday, April 3, 2014

Clean Smoothie Recipe - Maca Cacao

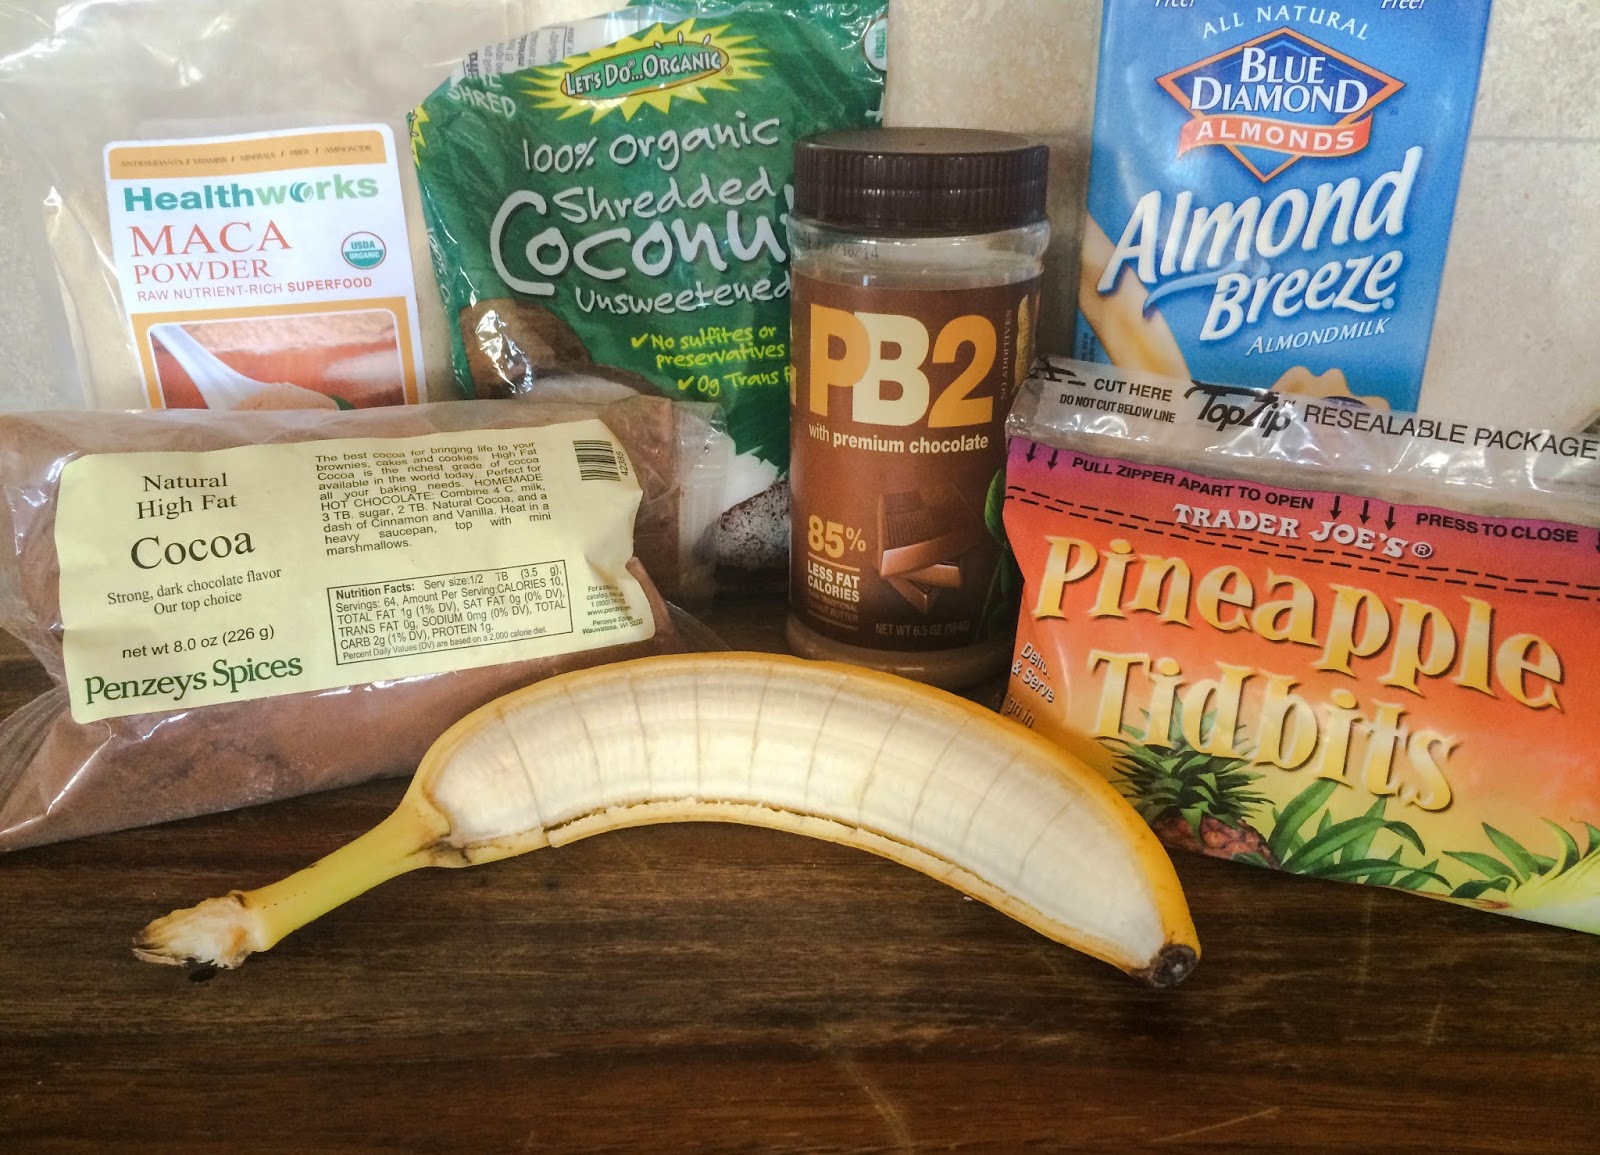
If you have yet to hear about Maca, now it the time to start getting familiar with it!! Maca, a plant grown in Peru for over 3000 years and used in medicine, is becoming a very popular superfood in american culture. My first experience with Maca was about 4 years ago when I went back to work after my son was born. During my afternoon break I, in my new Mama night after sleepless night fog would get a blended coffee from the health bar next store that featured Maca as one of its most beneficial ingredients. I have always been highly interested in nutrition and health though at that point in time I was so focused on making it through each work each day and running home to take care of my 16 month old and my 3 month old, I never really took the time to research what the health benefits of Maca were. 
Fast forward 4 years and I feel almost every health and nutrition information I encounter raves about the health benefits of Maca. Maca which is considered a superfood is beneficial for enhancing energy, stamina, memory and fertility. It helps woman with balancing hormones, menstrual problems, and menopause symptoms. It can also aid in lessing the effects of depression, osteoporosis, anemia,  and helps boost the immune system.** After learning this I decided to make it a mission to find ways to incorporate Maca into my families diet. It has a slight butterscotch smell to it and for me tastes a bit nutty. I tend to use it as an addition to sweet recipes. It blends well into smoothies and as an addition to doughs when baking.  Here is my recipe for a Maca-Cocoa Ice Cream. A low calorie nutrient and antioxidant dense sweet treat that is great as a desert, after school snack or mid-afternoon pick me up. 
Enjoy!


Maca Recipe
3 Frozen Bananas
1 Cup Frozen Pineapple
1 Cup Vanilla Almond Milk (unsweetened)
1 1/2 Tbsp Maca Powder
1 1/2 Tbsp PB2 Chocolate
1 1/2 Tbsp Coconut Flakes (unsweetened)
1 1/2 Tbsp Cocoa Powder (unsweetened)
Handful of Ice
*optional soak 1 tsp of chia seeds in the almond milk for about 15 min. then add all to mix

Blend until creamy and serve immediately or store in freezer.
Yields 4 servings at around 150 calories each

**these statements have not been evaluated by the FDA


Monday, March 31, 2014

Clean Recipe - Gluten Free Banana Bread


Gluten Free Banana Pecan Muffins

Have you ever taken a bite out of cardboard? Ok, technically, I have not either. Let me set the scene though. You are at the grocery store strolling through the aisles curiously picking up packages of food   checking the label looking at the bold lettering claiming all these healthy things. "No High-Fructose Corn Syrup!",  "No Sugar Added!", "Low-Fat!" Then you come across a box of "Gluten-Free" chocolate chips cookies. You have heard about this Gluten-free thing on the news, on the internet, that health guru you follow on instagram, and of coarse, from that overly spunky health nut mom down the way. Every one seems to be going gluten-free. So you grab the box put it in you cart and feel proud thinking "I too will be gluten-free and proud, take that yoga pant wearing spunky mom" (no offense to yoga pant wearing spunky moms, I have to admit my friends see me as that woman! haha) You get home and crack open the box, after all who can resist a chocolate chip cookie. You take a bite and start to chew your chewing slows as you pick up to box to make sure you read the label correctly. Yep, the box still says chocolate chips cookies, however what is in your mouth is far from the known and loved taste of chocolate chips cookies, this taste is more like cardboard! So let me ask you again, have you ever taken a bite out of cardboard. Chances are more people are going to say yes this time!!
Here is the good new! Gluten-free skeptics and gluten-free lovers can both rejoice over this recipe. No cardboard here. These muffins are incredibly moist and flavorful. My children loved them and my  gluten-free skeptic friends did not know they were gluten-free until I told them. Try them for yourself and Enjoy!!

Recipe:
3 overly-ripe bananas
1/2 brown rice syrup
1 large egg
1/3 Cup applesauce (I used some that had no added sugar)
1 Teaspoon vanilla extract
1 Teaspoon gluten-free baking soda
1 Teaspoon cinnamon
1/4 Teaspoon nutmeg
dash of cloves 
pinch of salt
1 1/2 Cups gluten-free flour
1/2 Cup chopped toasted pecans**

Heat oven to 350 degrees.
In a large bowl mash the bananas until almost no clumps are visible. Stir in brown rice syrup and egg then add applesauce and blend well. Add vanilla extract, baking soda, cinnamon, nutmeg, cloves and salt. Stir all together. Stirring slowly add in flour. Once all combined add pecans and blend in.
Either spray muffin tin with a non-stick spray or insert cupcake liners. 
Pour mix in each hole and bake for 25 min or until an inserted toothpick comes out clean!
Yields 12 Muffins
**To toast pecans lay them flat on a cookie sheet and place in oven (heated to 350 degrees) until aromatic, approximately 5 min.


Sunday, March 16, 2014

Kale Salad Recipe

I don't know about you but I, especially since becoming a mom, find it incredibly easy to be a creature of habit. When I grocery shop I have my essentials that I grab and go to make grocery shopping quick and efficient. But about two weeks ago while packing the kiddo's lunches I realized how bored I was with the usual fruit I have on hand.  Apples, mandarin oranges, grapes and frozen berries. I was then on a mission to find a new fruit we would all enjoy. I ended up grabbing an old favorite that I am now wondering how I ever neglected, Kiwi's!! Not only are they delicious, so sweet and juicy, but they are also a superfood. They are loaded with vitamins and antioxidants. Needless to say I have been adding them to any and everything I can! Guess you could say I am making up for lost time, haha. 
Here is an amazing gluten free, clean eating salad recipe I came up with. A must try, and it will now become my favorite go to salad for summer BBQ's. 
You must try it for yourself!

Ingredients:
2 cups chopped Kale
1 cup chopped Brussel Sprouts
2 tbsp Chopped Almonds
2 sliced Kiwis
1/2 Grapefuit peeled and sectioned
1/2 Lemon
1 1/2 tbsp Olive Oil
Salt 
Honey

How To: 
Preheat oven to 350 degrees. While it heats prepare the brussel sprouts. Once chopped toss them in 1/2 tbsp olive oil and pinch of salt. Roast in oven for 4 minutes. These will add a nice crunch to the salad. 
Chop kale and place in medium sized bowl. Squeeze the lemon over kale and drizzle with remaining 
1 tbsp olive oil. Toss and hand massage kale until it starts to soften. 
Once cooled add roasted brussel sprouts and chopped almonds. Toss all together and top with kiwis and grapefruit.
Finish it off by drizzling honey over the top and Enjoy!!


Thursday, March 13, 2014

Muffin Top (No More) Workout

As women most of us are all too aware of that moment when you sit down, while wearing jeans and your immediate reaction is to wiggle the waist line of your jeans up, to in effect, "tuck in" the pudge.  Its practically second nature, right? Most of us don't even realize that we are doing it, it has just become second nature! I have to say of my friends and family, one of the number one desires in regards to their body is to shrink their waist line. While diet plays a HUGE roll in the amount of fat that is accumulated around your middle. There are some great simple at home exercises that you can do to help tone and tighten your belly!
**Check out these other blog posts for additional tummy toning and waist whittling exercises:
Straight Arm Plank: 
Keep your hands directly under your shoulders (try not to round your shoulders), Keep your hips in a straight line between your feet and shoulders. (no droopy hips or butts in the air!!) Essentially you want to think of your body as making a side ways number 7. The straight arm plank is incredibly effective in toning the tummy because it's more challenging then the forearm plank. The further from the ground you are the less stable you are so your core has to work harder! (if you are new to working out I recommend starting with forearm planks) hold this position for as long as you can. Added bonus: this is a great exercise to strengthen and tone the arms, chest, and thighs as well!

Head Stand:
Many of you most likely haven't tried one of these since you were a kid, but this is one of my favorite core exercises. Balancing requires a ton of work from your stomach muscles. Headstands engage just about all muscles in the mid section making it a great way to tighten. Added bonus: turning upside down is also a great way to elevate your mood. I do headstands when I am grouchy for a quick mood boost!

Side Plank:
This plank is great for the love handles (side and back bulge). Try to keep your hips in a straight line with your feet and shoulders (as they would be while standing) with feet stacked on top of each other. For beginners slide your top foot to the floor directly in front of your bottom foot for added help balancing. You will no doubt feel the burn down your side in no time at all! Hold as long as you can then switch to other side.  
***For a more challenging workout that is also a great allover toner, quickly alternate between the side plank and the straight arm plank. Going from one side, to straight arm plank, to the other side, back to straight arm plank.. continue this sequence until you can no longer.

Weighted Side Bend:
Start with legs hip width apart standing straight shoulder back (envision your back, shoulders and heels pressed against a wall, this is the posture you want to have for this exercise) with weights in each hand, I use 5 lb. weights, slowly bend upper body to one side keeping hips in place and shoulders back, return to center then repeat on opposite side. Do 3 sets of 25 to each side.

Elevated Scissor Kick:
Using a workout roller (or another firm item that will elevate your hips about 6 inches off the ground) make sure your hips and lower back stay in a straight line with your shoulders. No arched backs!! You will feel the difference in how engaged your abs are when your body is in line. With controlled movement, swing your legs in opposite directions, one up to form a 90 degree angle with your upper body while the other leg swings down to form a straight line with your upper body. Repeat this for 3 sets of 40 reps (20 per leg)

Do this work out 3-5 times a week. You will feel and see results in no time!!


Thursday, March 6, 2014

Green Smoothie Recipe - Berry Kiwi

Smoothie Recipe!
Bottom (Green) Layer: 1 peeled kiwi, half of a seeded green apple, half frozen banana, handful of spinach, 1/4 cup coconut water, and handful of ice cubes.
Top (Purple) Layer: Half Frozen banana, 1/2 cup frozen mixed berries, 1/2 TBSP chia seeds, 1/4 cup coconut water.


Friday, February 28, 2014

Clean Recipe - Granola


Making granola at home is a very quick easy and affordable alternative to buying granola at the store.  I have been making granola at home for years! Over the years I have modified and tweaked different ingredients until....Viola!
I made my favorite version yet, it not only taste delicious, but it is also an excellent combination of ingredients that will keep your body's immune system nourished and strong during the cold and flu advisory months. (see below recipe for more info on nutrients)

Recipe
1 Cup Rolled Oats
2 Tbsp Quinoa Flakes (found in most health foods stores in the "grain" department)
2 Tbsp Pepitas 
2 Tbsp Chia Seeds
2 Tbsp Brow Rice Syrup
1 Tbsp Cranberries
2 Tsp Cinnamon

Heat oven to 350 degrees; Bake for 15 minutes turning half way through.
*Makes 4 (1/2 cup) Servings
198 Cal     5.5g Fat     32g Carbs     5.25g Pro     7g Sugar      5.25g Fiber
(nutrition per serving)

Sprinkle on top of greek yogurt and top with grapefruit, blueberries and your other favorite fruit. Enjoy!!
Why is this granola good for battling the cold and flu season? 
It is loaded with Zinc and Anti-Oxidants. Pepitas and Chia seeds are excellent sources of zinc which helps to support the immune system. Pepitas are also full of vitamin E. and Chia seeds are full of vitamin C, two main vitamins that the immune system loves! Topping the granola with grapefruit and blueberries further boost the the antioxidant level to this delicious breakfast/snack. 


Monday, February 10, 2014

Kids Valentines Day Treat


Kids Valentines Day Treat Idea- Chocolate Covered Pretzel Heart Bow and Arrow
This year at the kids school I am in charge of bringing food for the kids party in the "other" category. I wanted to think of something fun and festive that would still be savor worthy in the younger crowd. After much brain storming I came up with the idea to do these chocolate covered pretzel hearts with a bow and arrow. Hope you and your loved ones enjoy!!!! <3

Here is what you will need:
Parchment or Wax Paper
Sweethearts Candy 
White and Milk Chocolate Chips (or white and milk melting chocolate-found at craft stores)
Pretzel Minis
Pretzel Sticks
Red Food Coloring
                                                                                            

1- (optional, it helps the preztel stick to candy hearts better) With a small knife carve a hole into the top of the heart. Do this by pressing knife into candy and turning knife in a swivel motion.
2- Melt chocolate according to directions on package (I find stovetop double broiler method works best)
3-Once chocolate is melted dip pretzel sticks (bow and arrow) into chocolate until fully coated then stick one end of pretzel into carved hole in candy heart. Set the pretzel and candy heart onto parchment paper to harden. Make sure the pretzel and heart and well pressed together as this will insure a strong bond between them.
(my pretzels sticks had finger marks so I put the remaining chocolate in a bag with the corner cut off and touched up any uneven spots)
4- Allow chocolate to harden, it will take up to an hour.
5- Melt White chocolate and add drops of red food coloring until desired color is achieved.
6-Coat pretzel minis (hearts) in this mixture and lay on parchment paper to harden.
7- Once all "hearts" are coated immediately take the "bow and arrows" and place them diagonally across. You want to do this while chocolate coating on hearts is still pliable because as it hardens it will secure and ensure the bow and arrows are attached.

******This whole process will take about an hour to do. For a shorter version you can buy pretzels that are already coated (my local grocery store has raspberry yogurt covered pretzels that would work great as the hearts!) and melt chocolate to secure each piece together!!


Friday, January 31, 2014

Freeze Dry


This is a great quick dry nail tip for my fellow impatient women out there! I have the hardest time sitting still and waiting for my nails to dry after I paint them. Not to mention as a mom, down time to sit and allow the proper time for my nails to dry is few and far between. Plus I will admit it, there are few things as frustrating as taking the time to paint my nails only to discover 5 minutes later that one is smudged or dinged. I discovered this fabulous little trick a couple years back and it has become one of my favorite beauty short-cut. 
Before you paint you nails get a bowl, fill it up with cold water and some ice cubes. Let it sit while you paint your nails. Once complete with the painting process submerge your nails in the ice water for 2-3 minutes and whallah. Dry, smudge free nails!!


Thursday, January 30, 2014

All Natural DIY Face Mask

 All Natural Coffee Facial Mask

This here is one of the best all natural coffee facial masks. (clarification in case you were wondering what that brown goop face picture is, haha) I try to do this mask about once a week myself. All the ingredients have such great nutrients in them that are incredibly beneficial to the skin.  Every time I rinse this off my face I am amazed at how clean, fresh and even my skin looks (as you can see in the bottom pic, no make-up and no touch-up at all!!!)
I hope you try this at home, I guarantee you will be hooked after one try!!!
Here is how to do it:
1 Tbsp Coffee
1 Tbsp Pure Cocoa Powder
1 Egg White
1/2 Tbsp Honey
Mix all the ingredients together until a paste forms, spread onto face and let dry (usually takes about 15 minutes), rinse off with warm water and follow up with your favorite moisturizer!!
                                                                       
                                              Simple ingredients.
Afterwards. Fresh looking' skin!